Extending the web interface#
Note
This new documentation page has not yet been fully reviewed and may be incomplete.
LinkAhead’s web interface is built to be highly extensible. This tutorial will introduce you to the basic concepts of extending the web interface by adding a web form to trigger a server-side script. For illustration purposes, we will use the “Insert new instrument” form which you can find after log-in on the LinkAhead demo instance. This form allows users to insert a new instrument record by providing instrument type, name, and, optionally, price and manufacturer.
In this guide, you will learn how to:
Add a dropdown menu to the navbar of LinkAhead’s web interface that is visible only to users with certain roles
Add a button to this dropdown menu that opens a modal with the form in which we enter parameters for the server-side script.
Use the built-in functionality of LinkAhead’s web interface to set up the form and call the server-side script upon submission.
Put everything together in a JavaScript module that is loaded automatically when starting LinkAhead.
Prerequisites#
We assume that you have a working LinkAhead installation with a server profile with a custom
directory named custom, e.g., the demo or default profile of the LinkAhead Control repository. We further assume
that there is an executable server-side script insert_instrument.py in a location visible to the
LinkAhead server (custom/caosdb-server/scripting/bin/ by default). For more information on
server-side scripting, please refer to the server-side scripting documentation.
You can find the actual script
in the LinkAhead control repository in the demo profile.
The exact contents of the script are not important for this tutorial. It is sufficient to know that
the script is set up to understand input provided by submitting a web form created with LinkAhead
WebUI’s built-in methods to create a new MusicalInstrument record of a given instrument_type,
with given name, and, optionally, a price and a manufacturer. The manufacturer can either be
selected from the existing ones or the name of a new manufacturer can be provided. So we know that
our form will need the following fields:
instrument_type(dropdown, required)name(text input, required)price(number input, optional)manufacturer_id(dropdown, optional)new_manufacturer(text input, optional)
Navbar entry#
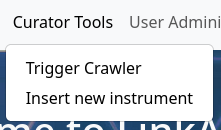
We’ll start by adding a new entry to the navbar of LinkAhead’s web interface which will be shown
only to logged-in users with the role administration. The final result will look like this (the “
Trigger Crawler” button is part of the demo profile and not relevant here):
To check whether a user is logged in and has a certain role, we can use the built-in JavaScript
functions isAuthenticated() and userHasRole(role_name) of LinkAhead’s WebUI as follows (assuming
that instrument_input_form.create_form_button() creates the button, which we will implement
below):
// only show the button and the form to logged in users with role administration
if (isAuthenticated() && userHasRole("administration")) {

    instrument_input_form.create_form_button();  // See below for implementation

}
The contents of instrument_input_form.create_form_button() might look as follows.
const SCRIPT_NAME = "insert_instrument.py";
const BUTTON_NAME = "Insert new instrument";
const HOVER = "Open a form to insert a new instrument into the database.";


const insertion_form = make_insertion_form(SCRIPT_NAME);  // See below for implementation

const modal = form_elements.make_form_modal(
    insertion_form,  // The form created below
    "Insert an instrument",  // Title of the modal
    "Choose the type and enter the name of the instrument you want to insert. Enter the price and either choose from the existing manufacturers or enter a new one."  // Description text
);

const button_element = $('<button class="btn-manual-insert">' + BUTTON_NAME + '</button>');
navbar.add_tool(
   button_element[0],  // Button element to be shown in dropdown
   "Curator Tools",  // Name of the dropdown menu (created if it doesn't exist yet)
   {  // Options for the button
       title: HOVER,
       callback: () => {
           $(modal).modal("toggle");
       }
   }
);
Again, we assume that make_insertion_form(scriptname) creates the form HTML element; we will
implement this below. We use the built-in form_elements.make_form_modal() method to that returns a
modal HTML element containing the form with a title and description text. Finally, we create a
button element and add it to a dropdown menu named “Curator Tools” in the navbar using the built-in
navbar.add_tool() method. If the dropdown menu doesn’t exist yet, it will be created
automatically. The button is set up to open the modal created above when clicked.
The web form#
We will now create the actual form. The modal with the submission form should look like this in the end:
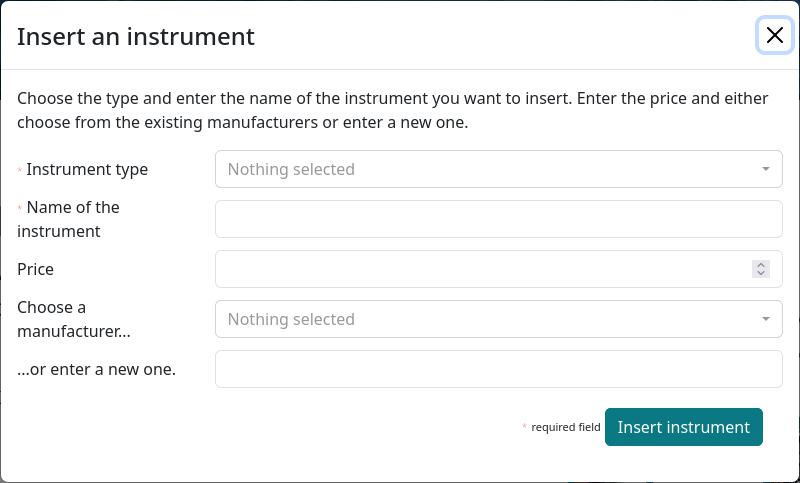
To create such a form, LinkAhead WebUI provides the form_elements module which contains several
utility functions to simplify the creation. Specifically, it contains the
form_elements.make_form(form_config) method that creates a form HTML element based on a
configuration object form_config. This config is a JavaScript object that, most importantly,
contains a fields array that defines the fields of the form. The complete
make_insertion_form(scriptname) function would be similar to the following example:
const make_insertion_form = function (scriptname) {

    const form_config = {
        script: scriptname,
        fields: [{
            name: "instrument_type",
            label: "Instrument type",
            type: "reference_drop_down",
            required: true,
            multiple: false,
            // exclude the abstract musical instrument type
            query: "FIND RECORDTYPE MusicalInstrument WHICH HAS NOT name=MusicalInstrument",
            make_desc: getEntityName
        }, {
            name: "name",
            label: "Name of the instrument",
            type: "text",
            required: true,
        }, {
            name: "price",
            label: "Price",
            type: "double",
            required: false
        }, {
            name: "manufacturer_id",
            label: "Choose a manufacturer...",
            type: "reference_drop_down",
            required: false,
            multiple: false,
            query: "FIND RECORD Manufacturer",
            make_desc: getEntityName
        }, {
            name: "new_manufacturer",
            label: "...or enter a new one.",
            type: "text",
            required: false
        }],
        proceed_text: "Insert instrument"
    };

    const form = form_elements.make_form(form_config);

    return form;
}
Note that the elements of the fields array in the form config contain different options, depending
on the type of the field. All fields must have a name, which will also be the key by which the
value of this field will be accessible to the server-side script after submission, and a type.
They can have a descriptive label and may or may not be required. Probably the most interesting
aspect of this example is the two dropdown menus for instrument_type and manufacturer_id, in
which users can select from existing entities. They have the type reference_dropdown and have a
query field which specifies the LinkAhead query which is executed to retrieve the options to
select from. An optional make_desc function can be provided to create human-readable labels for
the options (by default, the entity id is used). Such a function must take an entity object as input
and return a string which will be used as label. In our example, we use the built-in getEntityName
function which, unsurprisingly, returns the name of a given entity.
Putting it all together#
Combining all the above steps, we can create a JavaScript module like input_form.js from the demo profile of LinkAhead control. The contents of the module would look as follows:
// Filename: input_form.js
"use strict";

/*
* Define the parent object that will contain the input form and the
* button to trigger it that will be appended onto the CaosDB main
* panel in the web interface
*/
const instrument_input_form = new function () {

    this.init = function () {

        // only show the button and the form to logged in users with role administration
        if (isAuthenticated() && userHasRole("administration")) {

            instrument_input_form.create_form_button();

        }

    }

    this.create_form_button = function () {

        const init = function () {

            const SCRIPT_NAME = "insert_instrument.py";
            const BUTTON_NAME = "Insert new instrument";
            const HOVER = "Open a form to insert a new instrument into the database.";


            const insertion_form = make_insertion_form(SCRIPT_NAME);  // See below for implementation

            const modal = form_elements.make_form_modal(
                insertion_form,  // The form created below
                "Insert an instrument",  // Title of the modal
                "Choose the type and enter the name of the instrument you want to insert. Enter the price and either choose from the existing manufacturers or enter a new one."  // Description text
            );

            const button_element = $('<button class="btn-manual-insert">' + BUTTON_NAME + '</button>');
            navbar.add_tool(
                button_element[0],  // Button element to be shown in dropdown
                "Curator Tools",  // Name of the dropdown menu (created if it doesn't exist yet)
                {  // Options for the button
                    title: HOVER,
                    callback: () => {
                        $(modal).modal("toggle");
                    }
                }
            );
        }

        const make_insertion_form = function (scriptname) {

            const form_config = {
                script: scriptname,
                fields: [{
                    name: "instrument_type",
                    label: "Instrument type",
                    type: "reference_drop_down",
                    required: true,
                    multiple: false,
                    // exclude the abstract musical instrument type
                    query: "FIND RECORDTYPE MusicalInstrument WHICH HAS NOT name=MusicalInstrument",
                    make_desc: getEntityName
                }, {
                    name: "name",
                    label: "Name of the instrument",
                    type: "text",
                    required: true,
                }, {
                    name: "price",
                    label: "Price",
                    type: "double",
                    required: false
                }, {
                    name: "manufacturer_id",
                    label: "Choose a manufacturer...",
                    type: "reference_drop_down",
                    required: false,
                    multiple: false,
                    query: "FIND RECORD Manufacturer",
                    make_desc: getEntityName
                }, {
                    name: "new_manufacturer",
                    label: "...or enter a new one.",
                    type: "text",
                    required: false
                }],
                proceed_text: "Insert instrument"
            };

            const form = form_elements.make_form(form_config);

            return form;

        }

        init();
    }
}

/*
* Finally, add the from button to the main panel when the page is shown
*/
$(document).ready(function () {
    instrument_input_form.init();
});
For LinkAhead to find the new module, it needs to be placed in the
custom/caosdb-server/caosdb-webui/src/ext/js/ directory of the server profile. After restarting
the LinkAhead server, the new functionality should be available in the web interface.
File Upload#
Up until here, we have omitted the possibility to upload files via the web form. This is also
supported by LinkAhead’s web interface built-in form tools. To add a file upload field to the form,
you can simply add a new field of type file to the fields. In our example, we might want to
upload an image of the instrument. To do so, we can extend the example from
above as follows:
const make_insertion_form = function (scriptname) {

    const form_config = {
        script: scriptname,
        fields: [
            // ... other fields as above ...
            {
                name: "image",
                label: "Upload an image of the instrument",
                type: "file",
                required: false,
                accept: "image/*"  // Accept only image files
            }
        ],
        proceed_text: "Insert instrument"
    };

    // ... rest as above ...
}
This will add a file upload field to the form that accepts image files. The uploaded file will be
made available to the server-side script under the ./uploaded_files/ directory relative to the
script’s working directory. See the server-side scripting documentation
for more information on how to handle uploaded files in server-side scripts.
We now have created a web form to trigger a server side script with given parameters and file input, which is only available to administration users. From this point, you can start adapting, e.g., form config, conditions under which the form is shown, or whatever else comes to your mind to customize your LinkAhead web interface. If you want to learn more about the built-in JavaScript functions of LinkAhead WebUI, please refer to its API documentation